Sweet Caroline...

posted by Dan Loomis @ 5:48 AM
0 comments
![]()
Misc ramblings on what's going on in the Loomis household.
Well, it was bound to happen sooner than later. The Loomis family suffered its first broken bone. As you can tell, Olivia has bounced back quite nicely.

posted by Dan Loomis @ 1:47 PM
0 comments
![]()
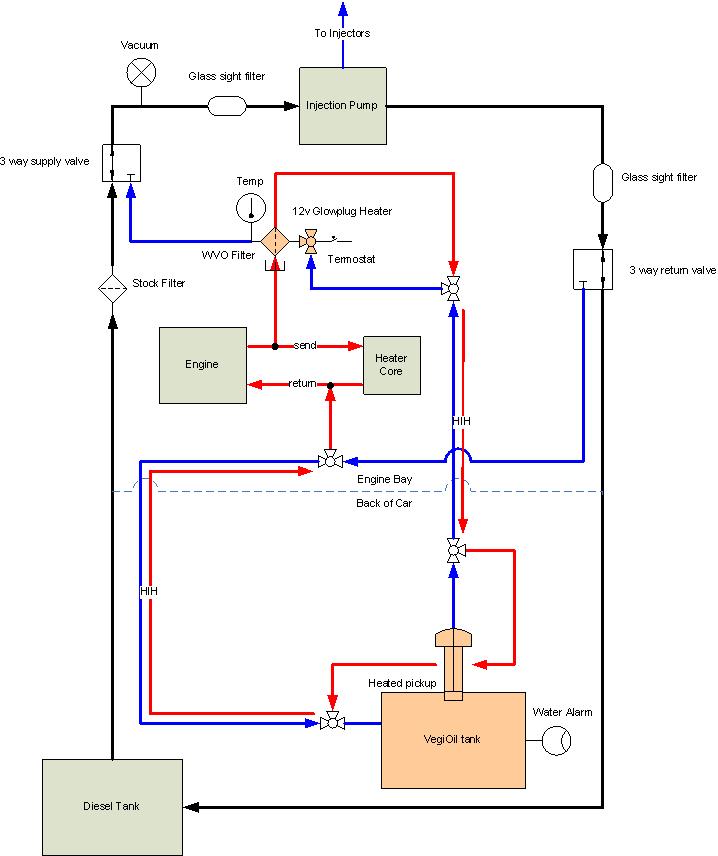
The title says it all. After some considerable thought I decided that converting the modern TDI engine is simply too risky. After all, I have goals to keep this car forevever, which is in direct conflict with running grease. Anyway, there are too many people on the TDIClub website that are killing their IPs, and worse, melting their pistons. Ouch!
posted by Dan Loomis @ 6:26 AM
0 comments
![]()
...with a satellite image of our new home, which is only 2 months old. This shot shows the foundation and possibly some framing. Pretty cool.
posted by Dan Loomis @ 7:21 AM
0 comments
![]()
This was in the latest Wired magazine...funny, funny stuff.
There's an easy formula for becoming a slacker: Do nothing. Go get more coffee. Repeat. But how can you slack and still keep your job? It's all about appearances. Dilbert creator Scott Adams lists low-impact ways to look like an overachiever.
Complain that you're totally swamped at every opportunity. Use phrases like "up to my ass in alligators" and "jumping from one fire to another" to make your job sound kind of sexy and dangerous.
Carry a piece of paper wherever you go. To give yourself the necessary urgent facial expression and body language, imagine it's something incredibly important, like a stay of execution from the governor.
Never clean your cubicle. After all, if you had any spare cycles you wouldn't let yourself live like a pig.
Emailing looks like work. Email friends and family often.
If you feel like talking instead of working, talk to your boss. That counts as work no matter what you're chatting about. The ideal topic of conversation is how poorly all of your coworkers are performing.
If you wear glasses, leave an old pair on the desk as though you will be right back. Then go home.
Leave voicemails for coworkers at 1:00 am, even if you're getting up just to take a whiz. If you really want to inspire awe, leave a message for your boss with your thoughts on the company's outdated filing system at 11:30 pm on New Year's Eve.
Be sure to get involved in unquantifiable projects. You want to be doing a lot of consulting and advising and attending. Avoid anything with a hard and fast deadline.
Learn to sleep with your back to the cubicle entrance. You'll have to practice to keep your head from slumping over, but it's worth it. If you can't pull that off, try a neck brace painted the same color as your skin.
Bitch about your job as much as possible. This is considered work even though it's fun.
posted by Dan Loomis @ 10:21 AM
0 comments
![]()
My grandmother died yesterday at her home, quitely in her sleep. I'll miss you, Mima.
posted by Dan Loomis @ 7:36 PM
0 comments
![]()

posted by Dan Loomis @ 7:23 PM
1 comments
![]()
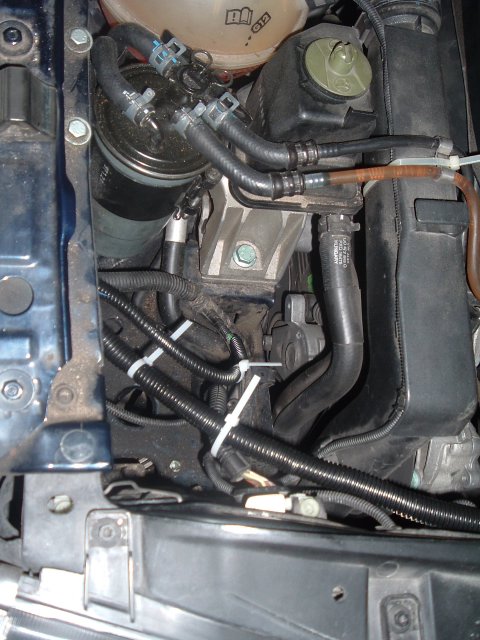
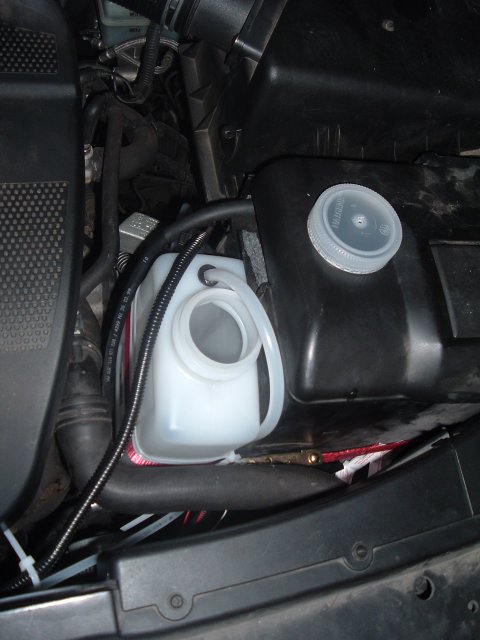
Wouldn't you know it, but as soon as I relocate the washer reservior I start getting problems. Some troublesome, some outright problematic. The short list:
posted by Dan Loomis @ 9:33 AM
0 comments
![]()

posted by Dan Loomis @ 10:55 AM
0 comments
![]()

posted by Dan Loomis @ 10:54 AM
0 comments
![]()
posted by Dan Loomis @ 10:54 AM
0 comments
![]()

posted by Dan Loomis @ 10:52 AM
0 comments
![]()
posted by Dan Loomis @ 10:51 AM
0 comments
![]()
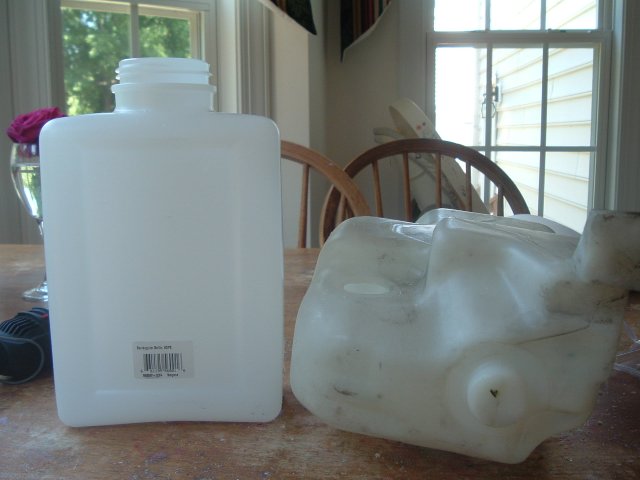
Undo the last post...I just can't bring myself to buy a kit. There is just too much engineer in me. So, back to the drawing board, so to speak.
posted by Dan Loomis @ 10:01 AM
0 comments
![]()
I've been back and forth about whether to buy an off the shelf kit, build my own, or cobble together some combination thereof. As you can see from my previous post, I was going down the "build my own" path. That is, until this post.
posted by Dan Loomis @ 4:12 AM
0 comments
![]()
posted by Dan Loomis @ 7:33 AM
0 comments
![]()
I found this post especially inspriring. So much so that I've started to implement some of the suggestions. Especially those items under "Do It Now!" and "Failure is your friend". I'll check back and post my results....hopefully there will be some growth in this area. I need it. ;->
posted by Dan Loomis @ 6:46 AM
0 comments
![]()
This is a *perfect* example of how *not* to ask for help on an Internet forum. This particular forum deals with waste/straight vegitable oil conversions for diesel engines.
posted by Dan Loomis @ 7:16 AM
0 comments
![]()

Married with children (4 girls - Mackenzie, Olivia, Emma, and Caroline), Product Manager for Pivotal Software in North Carolina. Graduate of Chantilly High School and West Virginia University (B.A. - Political Science) where I met my lovely wife Jennifer.


